Category: Bread

Cheese and Date Night

If we are at home on a Friday, we don’t usually eat a big meal, just usually have a couple of snacky things here and there. 

Friday Night Snack Plate 1Tonight’s snack plate had a distinctly retro feel so I thought I would share it with you!

Cheese and Date Bread

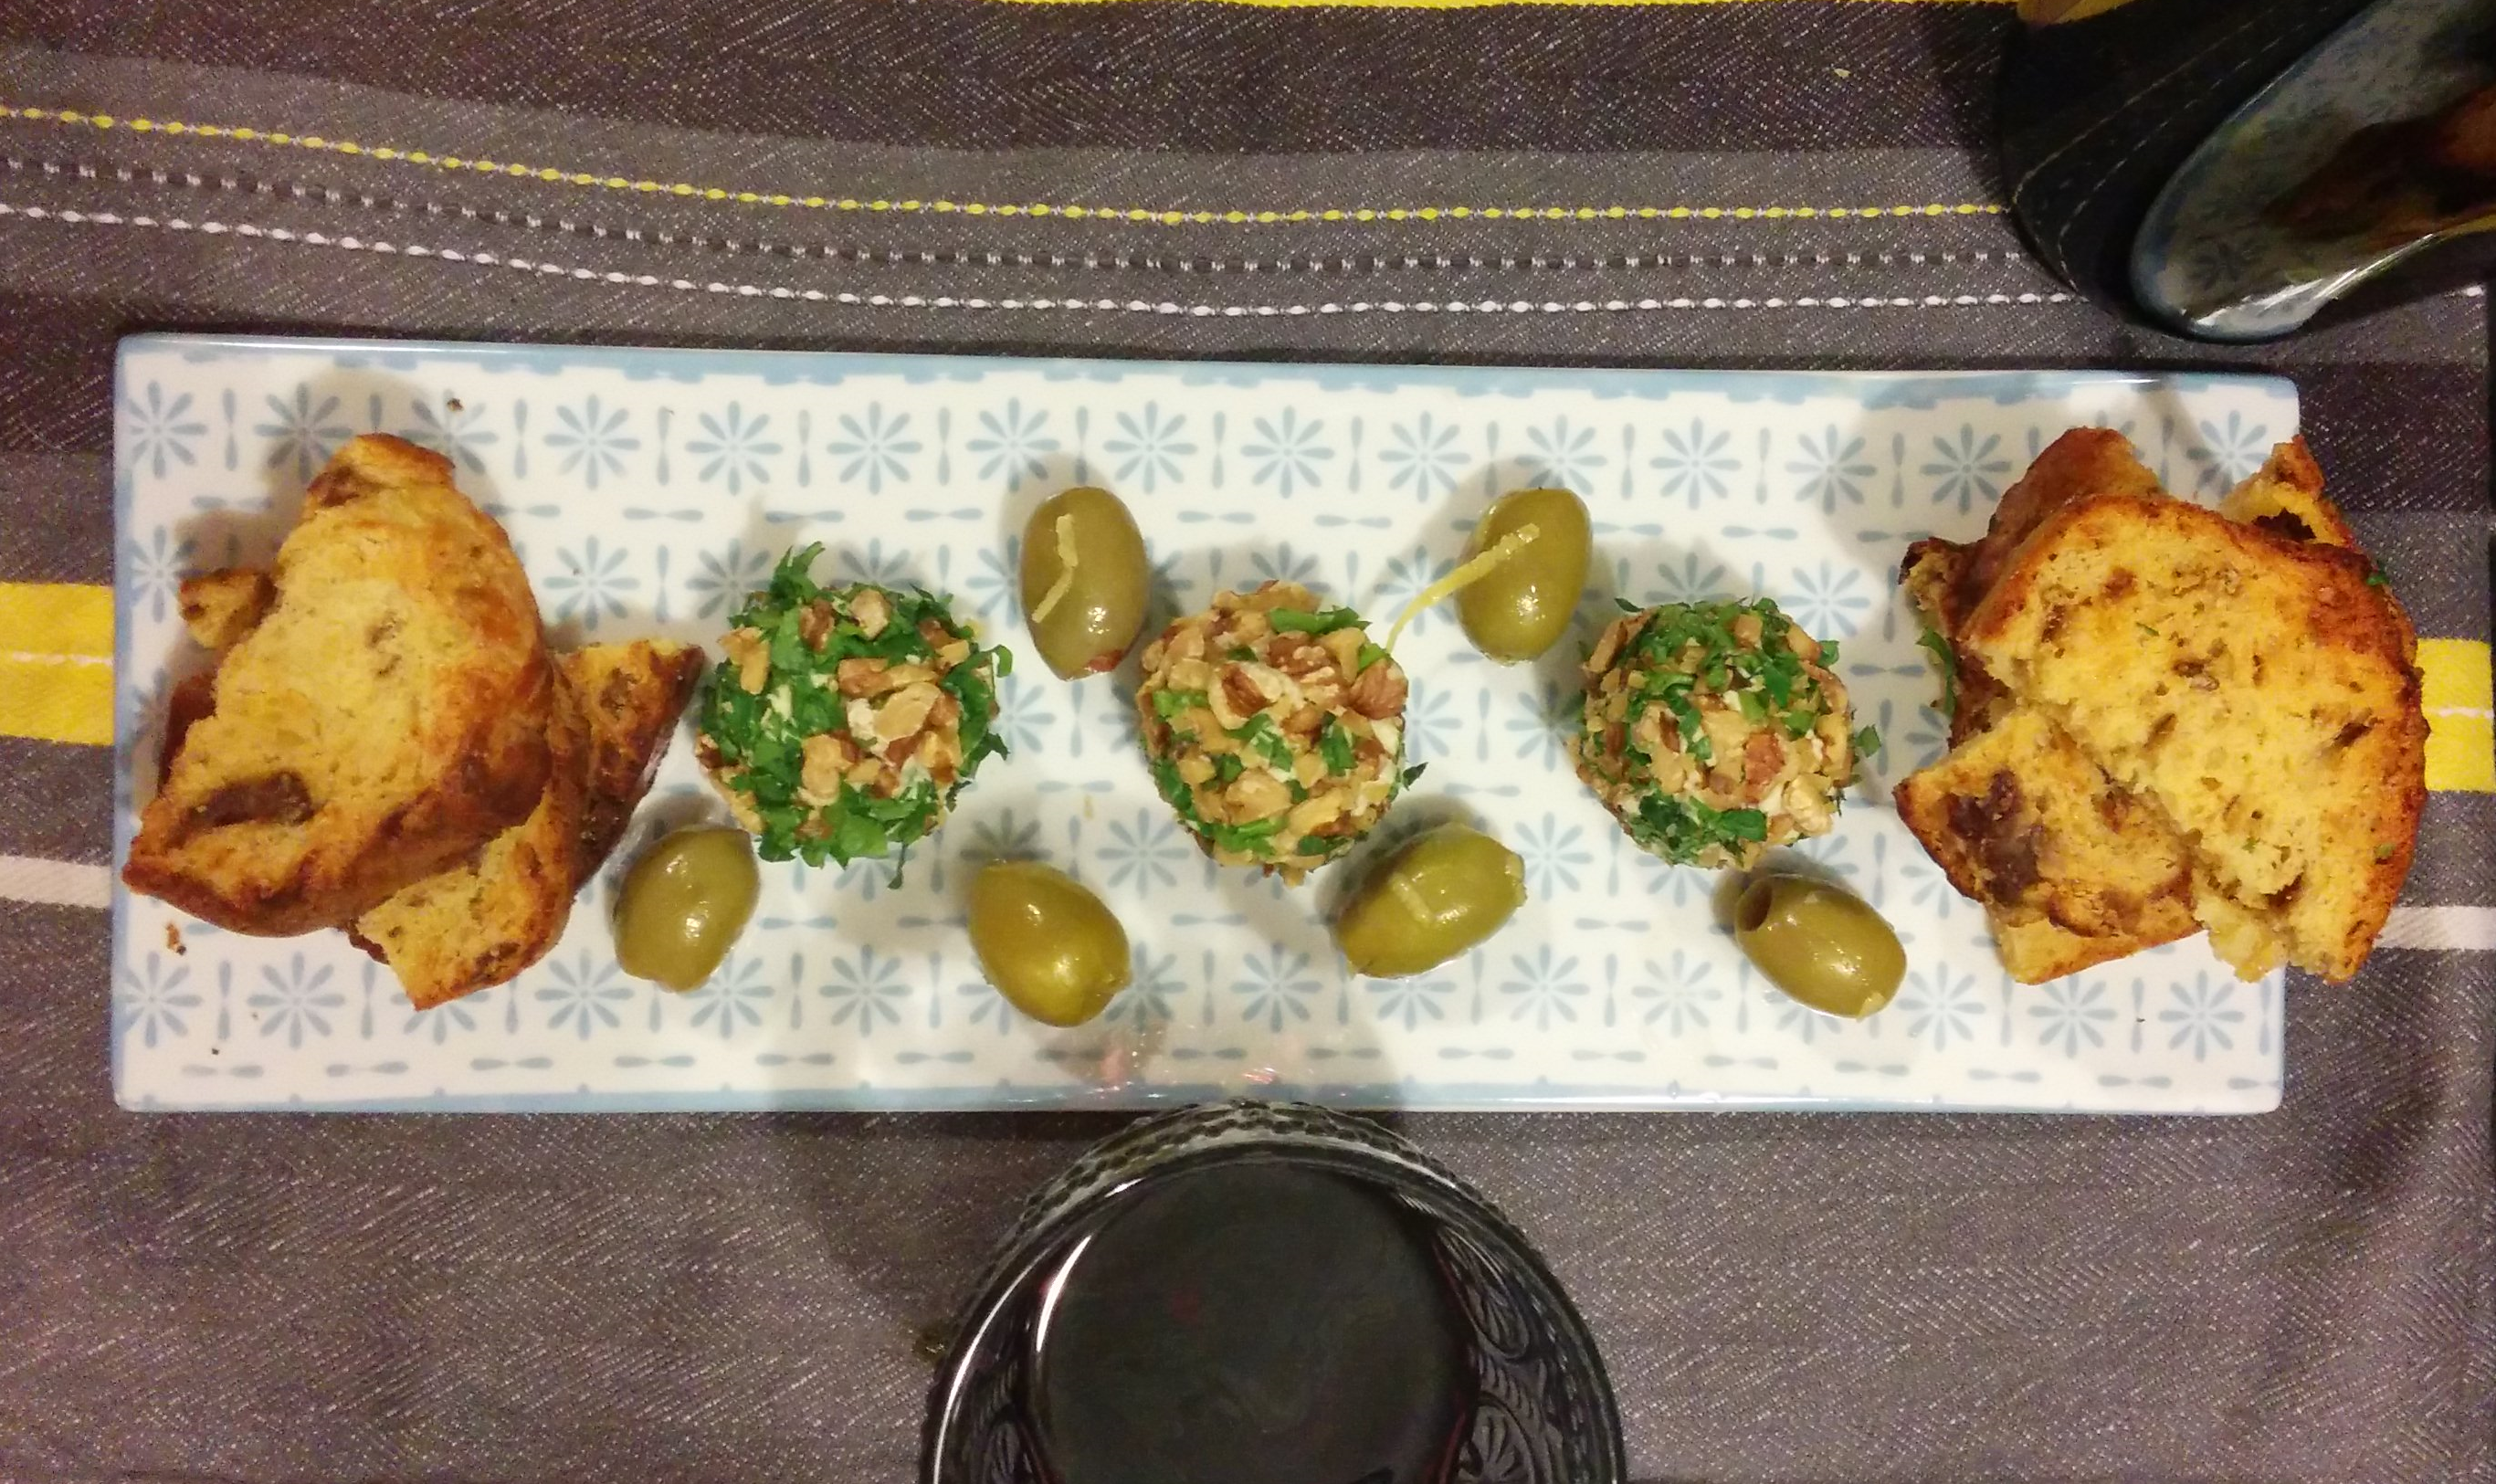
First up, we have some Cheese and Date Bread, courtesy of The A-Z of Cooking.  We have jumped somewhat forward here in that this recipe appears under G – Good Health, when technically we are only up to D – Drinks and Dips. And whilst Drinks and Dips are usually  good Friday fare, tonight it was something different.

Cheese and Date BreadI was intrigued by the idea of Cheese and Date Bread.  I really wasn’t sure how the sweetness of the dates would go with the rest of the ingredients.  These fears were completely unfounded.  And my bread looked just like real proper bread!

Cheese and Date Bread2

 If somewhat lopsided…

Cheese and Date Bread3

The bread is pretty good plain but if you want to take it to a whole new level?  Toast it up. 

Cheese and Date Bread4

 Cheese and Date Balls

Like I said, initially I was hesitant to make the Cheese and Date Bread.  What changed my mind was finding this  recipe for Cheese and Date Balls:

Epicurious – Cheese and Date Balls

Of course I made mini balls – because that’s how I roll. Also, I swapped out the lemon in the recipe above for a teeny splash of vermouth. 

Cheese and Date BallsMmmmm…blue cheese, walnuts and dates spread on toasted Date and Cheese Bread.  Life is good!

Cheese and Date Balls2

 But wait…there’s more. 

But first a little bit of disclosure.  I am actually trying something new tonight which is to cook (ok, assemble, I had actually cooked everything beforehand), photo, write, review and post all in the one night.  Normally this process can take WEEKS. I am also doing it whilst drinking a rather large martini which we will get to in due course.  So, if the end of this devolves into absolute gibberish, you know why and apologies in advance. 

Those olives you see on the plate?  Aren’t just any olives.  They are:

Martini Drenched Olives

Normally, you put your olive into a martini.  In this recipe, you put some martini into your olives!  This is so simple and really adds a new and different flavour to some otherwise ordinary olives. 

Print

Martini Drenched Olives

Usually, you put a olive in your martini. This recipe adds a little martini into your olives!

Ingredients

Scale
  • 2 cups green olives (I used stuffed olives because I had them)
  • 3 tbsp vodka
  • 1 1/2 tbsp dry vermouth
  • 1 tbsp lemon juice
  • 1 tsp shredded lemon zest
  • 810 cracked peppercorns

Instructions

  1. Rinse the olives under cold water and drain.
  2. Combine all the other ingredients.
  3. Place the olives in a bowl.
  4. Pour the other ingredients over.
  5. Refrigerate for at least an hour. (I kept mine in the fridge for nearly a week).

 But you know what?  If your going to have some martini drenched olives, why not make also make a Drenched Dirty Martini.  It is Friday after all!

Drenched Dirty Martini2

 The Drenched Dirty Martini is a dirty martini made with Drenched Martini Olives. 

Print

Drenched Dirty Martini

A dirty martini with a twist!

Ingredients

Scale
  • Splash dry vermouth
  • 90ml vodka
  • 1 tbsp liquid from Martini Drenched Olives
  • 2 Martini Drenched Olives
  • Ice cubes
  • Martini Glass

Instructions

  1. Swirl the vermouth in the glass and discard.
  2. Add the ice cubes.
  3. Combine the vodka and olive liquid. Add to glass.
  4. Add the Martini Drenched Olives
  5. Enjoy!


Drenched Dirty Martini

 Have a great weekend!

Signature 1 Vintage Valentine Quick as Wink2      PS – Love to hear your thoughts on the quick and dirty post.  I live in awe of the bloggers who manage to do something daily and would love to be able to increase my output.  Your feedback on me just banging something out like tonight v agonising over every comma is most appreciated! Thanks as always. xx

Locket’s Savoury & Pimped Up Locket’s Savoury (GF)

Pimped Up Locket's Savoury

One of the best things about 2014  was connecting with other cooks and bloggers and cooking from the same books. I love doing it in person at the Tasty Reads bookclub but it was also so much fun doing the Joan Crawford inspired dinner for Jenny’s book launch.

Locket's Savoury 1
Locket’s Savoury 1

So, I was super excited to find this blog:

https://thecookbookguru.wordpress.com/what-is-the-cookbook-guru/

Which is pretty much all cook-a-longs.  They choose a new book every two months and anyone can cook from the book and post on their own site.  Then, Leah shares what everyone posts on The Cookbook Guru.  What a great idea!!!

The book for January and February is Jane Grigson’s Vegetable Book.    First published in 1978, this has become a classic.  And very auspicious that I get to start with a book full of retro recipes.

I was even more excited that there were a whole heap of artichoke recipes because the local continental deli had been having a sale and I bought about a ton of artichokes because they were something insane like 50 cents a can.

Then I read Jane’s advice on

How to choose canned artichokes.

“Don’t”

Huh….Jane apparently doesn’t mince words.  I like her already. But anyway I hightailed it out of artichokes and landed at the very other end of the book at watercress and found this lovely recipe for a very fancy grilled cheese called Locket’s Savoury.

Locket's Savoury 2
Locket’s Savoury 2

I did have a little giggle when I read the name of this dish.  Back in the day, we used to have a footballer by the name of Lockett nicknamed Plugger because….I have no idea why and have sufficient lack of interest in football to be arsed to Google it.  Anyway, some time before the Grand Final one year (the equiv of the Super Bowl or the FA Cup Final),   Plugger hurt his groin.  And I swear for an inordinately long amount of time,  it seemed like if you picked up a newspaper, turned on the radio or the tv, all you heard about, all people seemed to care about was Plugger’s Groin.  Strangers would approach you on the street and say “So, do you think it will be good for the Granny?”

“What?”

“Plugger’s groin.”

Not since David Beckham made those underwear ads has an entire nation been so obsessed by the state of a football player’s nether regions.  And yes, by the way…we do nickname our Super Bowl/FA Cup etc The Granny. As in a little old lady.  That’s Australia for you.

So, all that was Lockett’s Unsavoury, let’s turn to the matter at hand – Locket’s Savoury

So simple. So delicious, and just 4 ingredients.

Bread

The original recipe called for white bread.  I used this beautiful seeded ciabatta. Jane’s recipe called for the crusts to be cut off.  I left mine on because I love the taste of the toasted seeds!

Locket's Savoury - Bread
Locket’s Savoury – Bread

 Watercress

One of my favourite  greens.  I love the peppery taste of it!

Locket's Savoury - Watercress
Locket’s Savoury – Watercress

 Pears

Are probably my least favourite fruit.  Will this recipe redeem them in my mind?

Locket's Savoury - Pear
Locket’s Savoury – Pear

 Stilton.

Mmmmmm…blue cheese. Happy days….

Locket's Savoury - Stilton
Locket’s Savoury – Stilton

Stilton is apparently the king of cheeses.  Who knew cheese had a royalty.  Who’s the queen?  And more importantly who is the red headed reprobate prince flashing it’s arse and donning a swastika for high jinks?

I’m betting it’s goats cheese.

Locket's Savoury3
Locket’s Savoury3

This was awesome.  It actually made me like pears.  And that’s saying something!
There’s a few more totally awesome watercress recipes in this same book and I have a ton of it left so you may get a few more o’ these before the month is through.  There is definitely one more I have to do.

Locket's Savoury 4
Locket’s Savoury 4

Here is Jane Grigson’s recipe:

Locket's Savoury RecipeThis was really good. Super tasty, super easy and I wouldn’t change a thing in Jane’s recipe.

Or would I?

The more I thought about it, the more it seemed very unfair that my gluten-free friends missed out on this delight.

So without further ado, meet the pimped up, gluten-free Locket’s Savoury

Pimped Up Locket's Savoury
Pimped Up Locket’s Savoury

Basically, scrap the bread, use a slice of pear as the base.  Add your watercress and Stilton.  Throw in some chopped walnuts.  Once done, sprinkle with some chives.

In some ways this was almost better.  Those pears got all caramelised and…dare I say it, delicious!!!

I’m so looking forward to doing the Cookbook Guru Cook-a-longs.  And you know what would be even better?  If you all did it too…

If you did want to, you already know the book for the rest of Feb.  March and April is The Food of Morocco by Paula Wolfert.  My local library has a copy of this. Yours probably does too.  I also got the Jane Grigson book from the library.

But PS..The Locket’s Savoury is the gift that keeps on giving.  Those little bits of blue cheese that slide off as you grill the cheese and go kind of crunchy.  So good to eat later!!!

DSC02463

Have a fabulous week!

And I would love to know your royal family of cheese!!!

Signature 1 Vintage Valentine Quick as Wink2

Print

Pimped Up Locket’s Savoury (Gluten Free)

A gluten free version of a delicious watercress, pear and blue cheese recipe from Jane Grigson

Ingredients

Scale
  • 1 pear
  • 24 sprigs of watercress, depending on size
  • 23 slices of Stilton
  • 4 walnuts chopped
  • 1 chive, chopped
  • Freshly ground black pepper

Instructions

  1. Slice the pears into six slices, discarding the core. You will have some rounder pieces as well as some more “pear” shaped pieces.
  2. Remove the leaves from the watercress sprigs and place over the pears.
  3. Cover with stilton
  4. Sprinkle with chopped walnuts
  5. Place under a hot grill until cheese is melted and walnuts are toasted.
  6. Sprinkle with chopped chive and black pepper.
  7. Enjoy!

Notes

  • You can easily increase the quantities for this, I made mine for one because I only had one pear and minimal watercress left.

Nutrition

  • Serving Size: 1

Cheesy Eggplant and Salami Sandwiches

Memories, misty water colour memories….

Eggplant Salami Sandwich

As I enter week two of Paleo, there is one recipe that I made earlier this year that is lingering in my mind as containing pretty much all the sins of Paleo but all the glories of delicious food.  Funny, the things I thought I would be craving – coffee, chocolate, hummus…not so much…but if you put one of these in front of my right now, I would step on you to get one.

I found this recipe in the same folder I found the recipe for the Smoked Trout Empanadas.I’ve changed it a bit to include the chili and the original chopped the salami and mozzarella and mixed them together.

I’m not sure if the lure here is:

  • The gooey, melty cheese
  • The crispy breadcrumbs
  • The spicy salami
  • The silky sauteed eggplant
  • The slighty sweet tomato sauce
  • The little hit of chilli
  • Or all of the above

But believe me, the sirens are singing this song loud and strong.  And you will be too if you make them.  So crispy, so cheesy, so gooooood….

I’m not going to say much this time (because I might cry).  I’m just going to let the pictures speak for themselves.

Eggplant Salami Sandwiches 2


Eggplant and Salami Sandwiches 3


Eggplant Salami Sandwich 4


Eggplant Salami Sandwich 5
Eggplant and Salami Sandwiches 6

Trying to remember, the way we were…

Have a fabulous week!

PLEASE eat some cheese for me.

Signature 1 Vintage Valentine Quick as Wink2

[yumprint-recipe id=’11’]

Molten Umami Meatball Sandwiches

Hello, hello it’s good to be back!

Umami Meatball Sandwich
Molten Meatball Sandwich

Did you miss me? I’ve been on holidays – three weeks out of the grey Melbourne cold and into the warmth of sunny Cambodia, Vietnam and Malaysia. The holiday was amazing and I will fill you in on the details over the next few weeks, most particularly about the amazing food.

Here is (literally) a taster….

You know how in most supermarkets you get tasting plates?  For example, earlier today in my local supermarket I got to sample 3 kinds of dumplings (prawn, scallop and mushroom), 5 flavours of kombucha tea and some chia pudding…(yeah, my local supermarket is awesome!)  Well, in Cambodia, the taster plates consist of Bamboo Worms…and only  $2 a kilo!

Bamboo Worms
Bamboo Worms

And these are deep fried crickets….an even better bargain at half the price of the worms…

Crickets
Crickets

This is me about to taste one of the bamboo worms:

Cambodia Taste Testing

But before we go there, I wanted to talk to you about meatballs. As much as we love Asian food, after three weeks of it we were craving something that wasn’t.  Funnily enough, we both had cravings for pretty much the same thing.

He wanted spaghetti bolognese.  I wanted spaghetti and meatballs.  I was doing  the cooking so spaghetti and meatballs it was!  As I was cooking these, I realised why this is such awesome comfort food (it’s not like either of us has Italian heritage). My meatballs are crammed full of umami flavours – parmesan, mushrooms, tomatoes, red wine….Hmmm…is red wine umami?  Well it’s pretty damn good even if it isn’t.  Also, the original recipe for this called for an anchovy fillet.  I didn’t happen to have any so I added saltiness with a dash of fish sauce…guess what?  More umami!

Spaghetti and Meatballs
Spaghetti and Meatballs (and the joys of a plate on your knee  in front of the telly…it really is good to be back)

The spaghetti and meatballs were delicious and everything I wanted – something to warm our bones in the winter cold, something that was quick and easy to cook after a day of travelling and something familiar – comfort food at it’s best!!!

They also require very little in terms of fresh ingredients so you can keep shopping to a minimum.  And, if you were super organised, you could make a batch and pop them in the freezer before you left.  (Massive sigh).  I would love to be that organised!!!!

So, it was spaghetti and meatballs for dinner and then, (this mixture makes a lot of meatballs) I made a molten meatball mountain (i.e, a meatball sandwich ) for my lunch the next day.  The meatballs were great with the spaghetti but for my mind, even better in the sandwich the next day.  And Oscar was on hand for any leftovers.

Of which there were none!

Molten Meatball Sandwich

Remember these?   Bamboo Worms

They tasted like this: Aftermath of the Bamboo Worm

I wouldn’t say this was the worst thing I have ever eaten…but it sure wasn’t good.  The outside was kind of crunchy and not so bad.  It was the inside that was gross.  It didn’t taste so much of anything, it just had an unpleasant texture – mushy and slightly gritty. Not to mention the thought that was impossible to dispel.  “That thing in your mouth?  That’s worm guts…you’re eating worm guts…that thing you just bit into, that was probably work heart….”

Not good.

Thank goodness I found much better things to eat in Phnom Pehn.  Which I will tell you about next time…

Have a fabulous week!

PS – Is anyone doing the kombucha thing?  I kind of want to grow my own….if you are please let me know!

Signature 1 Vintage Valentine Quick as Wink2


Retro Easter Part 2: Easter Lily Sandwiches

Let’s start with a caveat.

I am perfectly aware that these sandwiches do not resemble Easter Lilies and would, based on their look, be far more appropriately called Calla Lily Sandwiches.  But it’s Easter ok?

And take a look at them.  How pretty are they?  Perfect for an afternoon tea with the girls….

Easter Lily Sandwiches2
Easter Lily sandwiches

And they taste pretty damn good too!!!

There are a few recipes for these lily sandwiches floating about the interwebs. However, most of them use green onions for the stem.  I actually made it that way the first time but was disappointed in the taste.

Chomping on that big stalk made the sandwich way too oniony – I’m pretty sure no one else wants to bite into a huge chunk of onion like that either.  Or suffer the onion breath afterwards. But to use them as decoration only and take them out when it came to eating the sandwich seemed like a waste.  My first thought was to replace the onions with beans but when I went to buy the beans, I was waylaid by some gorgeous baby asparagus spears.

Easter Lily Sandwiches Ingredients

And my version of the Lily Sandwich was born.

If you can only get thicker asparagus you could cut the spears in half down their length.  If asparagus is not available, use beans or celery matchsticks – all of which I think would be preferable to the onion!

Oh and a tip for the frugal.  When you cut the circles out of the bread, don’t throw the rest of the bread out.  Save them to use for what my family call Ox-Eye eggs but is, I believe more commonly called,  Egg in A Hole the next morning!  Any asparagus left over can also be dipped into a runny yolk for a breakfast made in heaven!!!

Leftovers

Oh and if you don’t happen to have a rolling-pin handy, a bottle of your favourite sauv blanc works equally as well.

Impromptu Rolling PinAnd would also be the perfect accompaniment to these sandwiches at your Easter afternoon tea!

Easter Lily Sandwiches3
Easter Lily Sandwiches3.
Print

Easter Lily Sandwiches

Pretty asparagus sandwiches, perfect for a Spring afternoon tea!

  • Prep Time: 10
  • Cook Time: 5
  • Total Time: 15 minutes

Ingredients

Scale
  • 1 bunch of asparagus
  • Slices of white bread, as many as you have asparagus spears
  • 1 tub of cream cheese or a herb and garlic flavoured cream cheese like a Boursin
  • 2 tbsp fresh chopped chives (omit if using a flavoured cheese)
  • 1 clove of garlic, crushed (omit if using a flavoured cheese)
  • 1/2 cup pistachios finely chopped
  • 1/2 tsp smoked paprika
  • Carrots cut into matchsticks, the same number of matchsticks as asparagus spears
  • Salt & Pepper to Taste
  • Instructions

Instructions

  1. Tail the asparagus and steam until just tender.
  2. Mix the cream cheese, paprika, nuts, salt and pepper and herbs in a bowl until smooth and creamy.
  3. Using a cookie cutter, cutter cut out rounds from bread.
  4. Then with a rolling pin, roll each round so it’s about 1/8 inch thick.
  5. Spread about a teaspoon of the cream cheese mixture over each bread circle.
  6. Place the carrot stick so it peeps out of the top, and the asparagus spear so it pokes out of the bottom. Fold the bread over to seal.
  7. Voila! You have a lily sandwich.

One more Easter Treat to go…stay tuned!

Signature 1 Vintage Valentine Quick as Wink2